How To Use a Roof Safety Harness

Safety
September 12, 2020

Using a roof safety harness correctly sounds like something that should not be a big deal, but it is. It’s a process, and it’s not overly difficult, per se, but it will take time. On the bright side, though, it’s not that expensive to use a roof safety harness properly. While you will need to acquire multiple pieces of equipment, and it requires a fair amount of labor and means following carefully laid out instructions, its overall simplicity and lack of major costs incurred make it something that can be carried out without too much trouble. In fact, a quality roof harness system itself should not be terribly hard to acquire and install and will likely cost you less than $500.

Climbing Up

One additional cost will be an extension ladder, as any quality roof professional, such as Interstate Roofing, would recommend purchasing a sturdy extension ladder to help with your safe roof work. Fiberglass ladders are better protection from electrocution in case a power source gets touched, but aluminum can be good too because it’s light and easy to carry around. When using the ladder to assist with the roof safety harness, it’s best to place it on firm ground or else use plywood for the base. You will have to tie the top of the ladder to a secure anchor point on your roof to keep it from sliding sideways as you make your way onto the roof.

You will need to step from the ladder to the roof, and that can be scary, but you can make it safer by not carrying anything up the ladder with you, extending the top of the ladder three feet so you have something you can hang onto if necessary, and keeping two hands on the rung of the ladder at all times to keep your balance.

Safe Practices

Once you’re on the roof, there are several safety measures you will want to take as well. Wear shoes with rubber soles for extra traction and keep them free of dirt and mud. Secure any power tools you’re working with using bungee cords or rope. These cords and ropes should never be positioned underfoot because that would make them very slippery. Hand tools should be stored in a five-gallon bucket and hung on a roof bracket. Also, don’t be a hero: stay off the roof if the weather conditions pose any danger. If you feel uncomfortable in any way, call a roofing professional to take care of the job for you.

Speaking of making something slippery, you should do everything you can to stay off tile roofs because they are easy to slip off and cause injury to yourself. If you have a tile roof, it’s best to call a professional right from the start.

You should also remember that while your safety is clearly extremely important, so is the safety of those around you. In that vein, you should mark off the ground below where you’re working so that people know you’re working there and can protect themselves accordingly. If you have to drop tools off the roof, proceed with extra caution and call out so that in case your aim is poor when you toss a tool from the roof, people who are in the general vicinity can be warned to move as far out of the way as possible.

Safety Gear

Roof brackets are also an enormous help in terms of correct roof safety harness usage, as they allow for a safe place to step onto the roof and store materials while acting as a slide guard to help you keep your balance on the roof. Roof brackets need to be nailed to the structure of the roof, and the best way to go about doing that is to lightly tap across the roof with a hammer looking for solid wood.

When you find it, carefully slide the pry bar’s blade underneath the shingle and gently bend the tab upward before placing nails over by where the shingle will cover them. You should place one roof bracket every four feet along the edge of the roof where you will be working. Doing this will ensure maximum safety, as it will make the area much more stable for storing your tools and for your ability to balance yourself when walking on the roof.

Another piece of roof safety gear is critical to proper roof safety harness usage: a lanyard and rope grab. Additionally, you’ll need a cat’s paw, cordless drill, safety glasses, tape measure. Having these necessary materials at hand makes it far easier to install and correctly use your roof harness to achieve the safest work environment on your roof.

Wearing the Harness

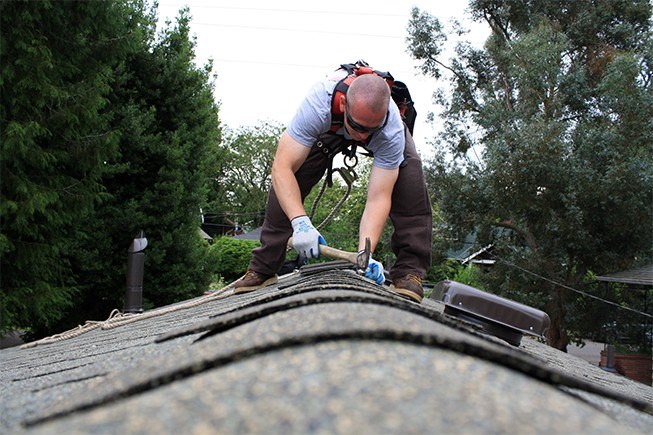
Once you have taken all the necessary precautionary measures and acquired all the necessary equipment, then you can fit and fasten your roof safety harness. Strap the safety harness in and tighten the straps to ensure it fits snugly. Inspect the harness and lanyard to make sure they don’t have any worn webbing or loose stitching. If you find any worn material, you absolutely cannot use the harness. It’s too much of a safety risk. This also goes for any frayed rope: never use frayed rope to secure a harness.

You shouldn’t work more than six feet to the side of a roof anchor, so if this ends up being an issue, either move the anchor or add more anchors. After you have proper distance, mount an anchor no more than six feet from the edge of the roof and reposition the rope grab so you can minimize the space in the rope between you and the roof anchor. This will allow for your roof harness to be as safe and secure as possible. This will mean the least risk possible for your health and to your roof.